| Technical Articles |
|
Installing an Edelbrock Victor Series Water Pump By Paul Eschenbach 8/20/00 |
 |
 One
of the most common modifications made to all Ford Broncos is the
installation of a higher capacity cooling system. The stock cooling
systems in most Ford trucks leaves a lot to be desired. Many Bronco owners
complain of their trucks running too hot while towing or while sitting in
traffic on very hot days. One of the main causes of this problem is the inefficient
open-impeller water pumps (see Fig. 3 bellow) that most of us are running
on our trucks. I am not sure if Ford installed these kinds of pumps
from the factory, but I do know that every replacement water pump I have
ever seen from auto parts houses such as Advance, Autozone, and Pepboys
are of the open-impeller design. One
of the most common modifications made to all Ford Broncos is the
installation of a higher capacity cooling system. The stock cooling
systems in most Ford trucks leaves a lot to be desired. Many Bronco owners
complain of their trucks running too hot while towing or while sitting in
traffic on very hot days. One of the main causes of this problem is the inefficient
open-impeller water pumps (see Fig. 3 bellow) that most of us are running
on our trucks. I am not sure if Ford installed these kinds of pumps
from the factory, but I do know that every replacement water pump I have
ever seen from auto parts houses such as Advance, Autozone, and Pepboys
are of the open-impeller design.
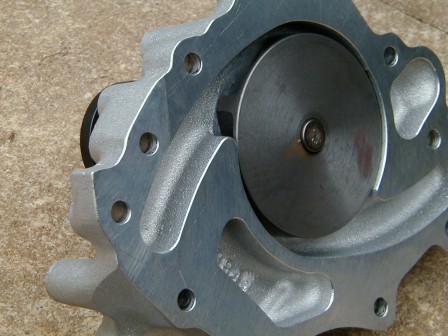
My Bronco was no different. So while I was rebuilding the engine, I decided to try a new closed-impeller Victor Series water pump from Edelbrock. As soon as I opened the box, the difference between my water pump and the Edelbrock was apparent (see Fig. 1)
It was also nice to see a product from the aftermarket industry that was made with this kind of quality. The casting and the machining on the Edelbrock pump seemed flawless. A close look at the impeller (Fig. 2) shows the unique computer-designed cast iron impeller that Edelbrock claims is 20% more efficient that the open-impeller design (Fig. 3). Actually, this type of impeller is not all that unique. It is almost identical to the factory impellers installed on the old Oldsmobile Rocket V8 engines. In fact, Oldsmobile is just about the only automotive manufacture who uses this kind of impeller on their water pumps (at least in the old days). All right. So it looks great, but what really matters is how well it performs and how well it fits. So our first priority is getting the pump installed. When installing the pump, be sure to follow these steps:
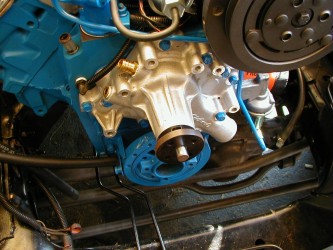
Well now that the pump is installed I can honestly say that the installation of the pump was flawless. All of the original water pump bolts slipped right it with no problem. The AC, PS pump, and Alternator brackets bolted right up to the pump without a hitch. Anyone who has ever bought and installed any aftermarket parts knows that this kind of installation is very, very rare. So how does it work? GREAT! I have not had the engine running very long since I installed this pump, but so far it can handle my high horse power 406 in 90 degree heat with no problem. It defiantly runs cooler than the old pump. I strongly recommend this pump, not only for applications where the engine is running hot, but anytime a water pump needs to be replaced on a Ford product. It looks great, it fits well, it weighs less than the old iron pump, and most of all it really works. The price is a little high (it cost me $156.00) but it is well worth the price. g Paul's Product Score: I give this product a 9.5. It could have easily scored a perfect 10, but I had to deduct points because it didn't include a 3/8" pipe plug for vehicles that only use one heater hose outlet on the pump. This meant I had to make a trip to the hardware store during the installation, and I HATE going to hardware and auto parts stores in the middle of a project! |
![]()
![]()