|
 It's
inevitable. One day you're going to have to change the power steering
box in your Ford 4x4 or your 78-79 Bronco. Unfortunately, there aren't
many choices out there due to the rarity of this particular PS box.
Sure, you can try to buy one from your local auto parts store, but be
warned that if you do so, there is a VERY GOOD CHANCE that the box will
either be defective right out of the box or start leaking within one
year. The reason this happens is that the cheap rebuilders that places
like Advance, Pep Boys, and Napa buy these boxes from don't the take the
time to install new shafts when they rebuild the boxes, even if the shafts
are worn, grooved or pitted. The most they will do is turn down a worn
shaft and then install a standard-size seal over the now smaller shaft,
which will blow out and begin leaking within a year. It's
inevitable. One day you're going to have to change the power steering
box in your Ford 4x4 or your 78-79 Bronco. Unfortunately, there aren't
many choices out there due to the rarity of this particular PS box.
Sure, you can try to buy one from your local auto parts store, but be
warned that if you do so, there is a VERY GOOD CHANCE that the box will
either be defective right out of the box or start leaking within one
year. The reason this happens is that the cheap rebuilders that places
like Advance, Pep Boys, and Napa buy these boxes from don't the take the
time to install new shafts when they rebuild the boxes, even if the shafts
are worn, grooved or pitted. The most they will do is turn down a worn
shaft and then install a standard-size seal over the now smaller shaft,
which will blow out and begin leaking within a year.
 Fortunately,
there are a few companies out there who will take the time to rebuild
one of these boxes the right way. One of these companies, and perhaps
the best know, is AGR Performance Steering out of Fort Worth, Texas. Due
to the rarity of the Bronco PS Box, no one, including AGR, keeps these
old Ford boxes in stock. However, you can send your PS Box to AGR and
they will rebuild it and have it back to you in 5 to 7 weeks from the
time you ship it to them. I know that's a long time to wait, but it's
worth it in the long run. If you can't have your Bronco down for that
long, then you can just do what I did; find another 78-79 PS Box and
send it off to be rebuilt. Sure, you'll have a spare box when you're
done, but you can always sell it on eBay! Fortunately,
there are a few companies out there who will take the time to rebuild
one of these boxes the right way. One of these companies, and perhaps
the best know, is AGR Performance Steering out of Fort Worth, Texas. Due
to the rarity of the Bronco PS Box, no one, including AGR, keeps these
old Ford boxes in stock. However, you can send your PS Box to AGR and
they will rebuild it and have it back to you in 5 to 7 weeks from the
time you ship it to them. I know that's a long time to wait, but it's
worth it in the long run. If you can't have your Bronco down for that
long, then you can just do what I did; find another 78-79 PS Box and
send it off to be rebuilt. Sure, you'll have a spare box when you're
done, but you can always sell it on eBay!
 when
you're finished. when
you're finished.
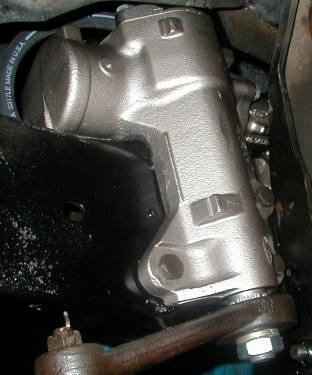
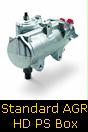
 AGR
can perform a standard "R&R" on your PS Box, which
basically means you get a very high quality rebuild, or you can have it
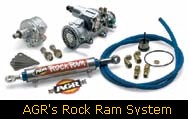
converted over to AGR's famous "Rock Ram" system show in the
picture to the right. I opted for the standard HD R&R because I'm
only running 33" tires on my Bronco. If you are running larger
tires and/or do a lot of serious rock crawling, then you might want to
consider upgrading to the Rock Ram system. You'll have to call AGR and
get a quote for your particular Rock Ram application, but if all you
need is the HD R&R box, then it will cost your roughly $295.00 to
$450.00, depending on the condition of your old PB Box. (mine cost about
$325.00). AGR
can perform a standard "R&R" on your PS Box, which
basically means you get a very high quality rebuild, or you can have it
converted over to AGR's famous "Rock Ram" system show in the
picture to the right. I opted for the standard HD R&R because I'm
only running 33" tires on my Bronco. If you are running larger
tires and/or do a lot of serious rock crawling, then you might want to
consider upgrading to the Rock Ram system. You'll have to call AGR and
get a quote for your particular Rock Ram application, but if all you
need is the HD R&R box, then it will cost your roughly $295.00 to
$450.00, depending on the condition of your old PB Box. (mine cost about
$325.00).
So,
let's get to it. My AGR box finally arrived last week and I just
finished putting it on today. Please read the following installation
section VERY CAREFULLY because I have included lots of tips that
will make your installation a breeze! I have changed my power steering 4
times now with in the last two years (don't ask, long story) and every
time I've changed it I've discovered better ways of doing it. The first
time I changed it was a nightmare, but now I can put one on in about an
hour and a half from start to finish :-) Power
Steering Box Installation Instructions
-
Step
One -- The first thing to do is make sure you have all the tools
necessary to do the job. You will need the following:
-
One
1/2" open-end wrench
-
One
5/8" open-end wrench
-
One
1/4" socket wrench and a 12 point 7/16" socket
-
One
18" adjustable open-end wrench or a 1 5/16" socket
(nut measures 1.300") made for at least a 1/2" socket
wrench
-
One
1/2" socket wrench and a 6 point 3/4" socket
-
One
pitman arm puller, or a heavy-duty gear puller
-
One
3 1/2 lb sledgehammer (incase your pitman arm is rusted to the
PS box shaft)
-
One
large screw driver
-
One
roll of Teflon tape (also called plumber's tape)
-
Step
Two -- The next thing to do is to get your truck in position to
start working on it. You need to make sure you get the front wheels
perfectly straight before you start to tear into it. I like to drive
it straight ahead for about 50 feet or so so that I know the wheels
are straight. Also, make sure you park your truck on a hard, level
surface because you will have to jack up the truck before you're
finished.
-
Step
Three -- Set the parking braking and chalk the rear wheels, just
to be safe
-
Step
Four -- Open the hood and remove the windshield wiper fluid reservoir.
-
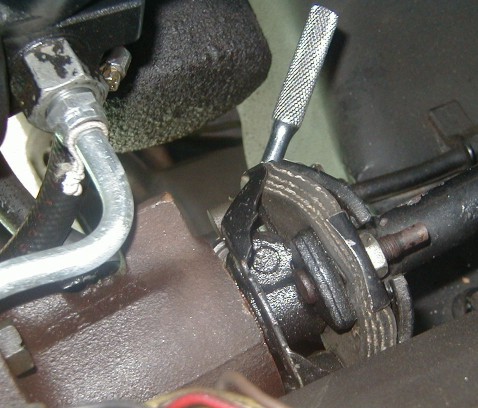
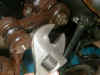
Step
Five -- Get out the 1/4" socket wrench and the 12 point
7/16" socket and remove the flex coupler retaining bolt as
shown in figure 1 below
 |
 |
 |
| Figure 1 |
Figure 2 |
Figure 3 |
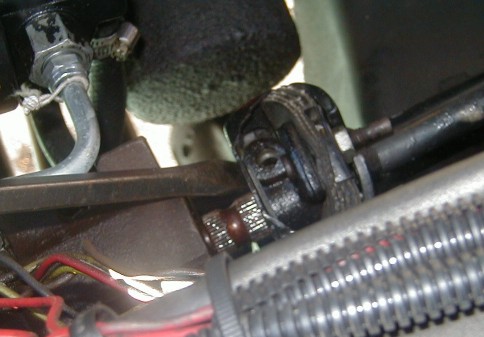
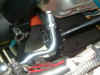
- Step Six -- Now pry the flex
coupler off of the steering box splines with a large screw driver as
shown in Figure 2 above.
- Step Seven -- Now remove the
lines going into the box. First, use the 5/8" open-end wrench
to remove the return line. Second, use the 1/2" open-end wrench
to remove the pressure line. I found it easiest to remove them from above
(leaning over the driver's side fender) rather than from underneath.
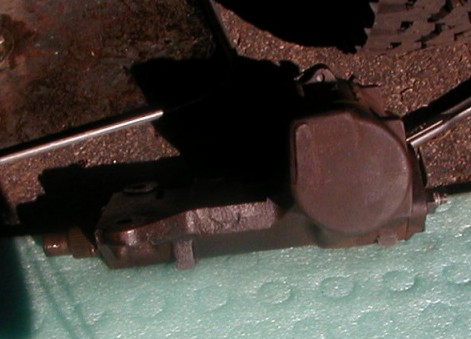
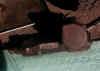
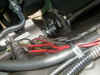
- Step Eight -- Before going
any farther, I like tie a rope or affix a bungee cord around the tie
rod and the steering damper to hold the assembly in place once it is
removed from the power steering box. Figure 3 shows the bungee cord
I used.
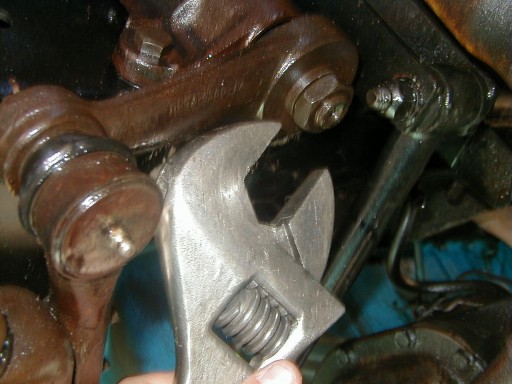
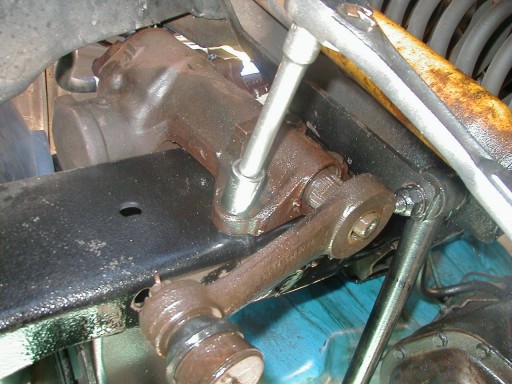
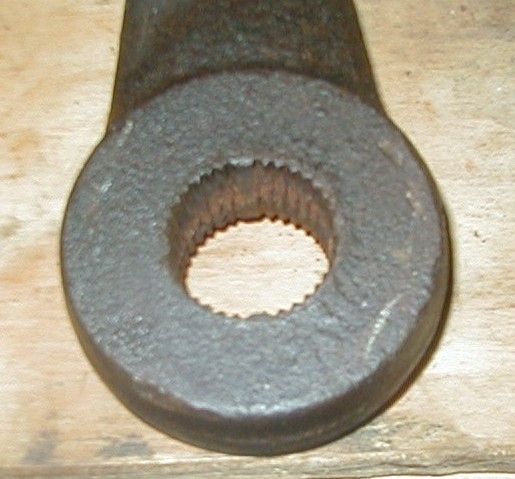
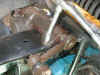
- Step Nine -- Now it's time to
remove the pitman arm from the steering shaft. First, remove the
retaining nut from the bottom of the power steering box with the
18" open-end wrench (or a 1 and 5/16" socket). Second, you
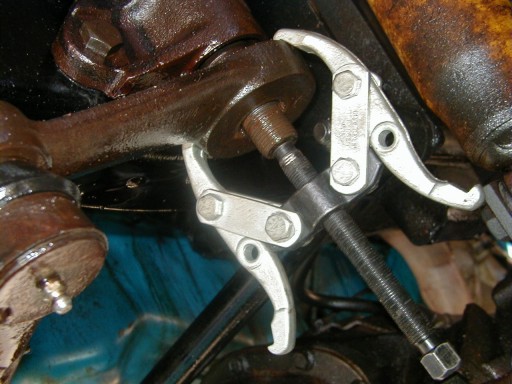
need to separate the pitman arm from the splined shaft. Ideally, you
should use a pitman arm puller to remove it, but you can use a gear
puller like I did in Figure 5 below. If you have trouble getting the
pitman arm off with your puller, then your pitman arm may be rusted
on to the shaft (like mine was). In this case you may need to give
the pitman arm a couple of good wraps with a 3 and 1/2" sledgehammer to
break it loose. I tightened the gear puller as tight as I
could get it and then hit it a couple of times with my hammer and it
came right off. Note: you might notice
in Figure 6 below that even though I have the pitman arm broken
loose from the shaft that it did not come all the way off. If you
look closely, the track arm bolt to the right is preventing it from
sliding off of the shaft. That's okay because as soon as you remove
the three bolts that hold the box to frame in the next step below
the pitman arm will slide right off (just wiggle the box a little)
 |
 |
 |
| Figure 4 |
Figure 5 |
Figure 6 |
- Step Ten -- Now remove the
three bolts that hold the box the frame as shown in Figure 6 above.
You will need a 3/4" socket on a 1/2" socket wrench to
remove the bolts. There is no real order you have to follow when
taking them out, but I removed the one towards the front first
(shown in Figure 6) and then removed the two bolts closest to the
shock absorber. Once you have all three bolts out the box can be
 removed.
Caution: Make sure you have one hand on
the box when you remove the last bolt. You don't want this thing
falling on you as it weights almost 45 lbs!!!! Also, I found
it easiest to remove the box from underneath the vehicle. All you
have to do is push up slightly on the plastic fender well and you
can slide it right off the frame. Just be VERY, VERY careful when
you remove it!!!! Make sure you give yourself enough room to get out
of it's way incase you can't hold it. removed.
Caution: Make sure you have one hand on
the box when you remove the last bolt. You don't want this thing
falling on you as it weights almost 45 lbs!!!! Also, I found
it easiest to remove the box from underneath the vehicle. All you
have to do is push up slightly on the plastic fender well and you
can slide it right off the frame. Just be VERY, VERY careful when
you remove it!!!! Make sure you give yourself enough room to get out
of it's way incase you can't hold it.
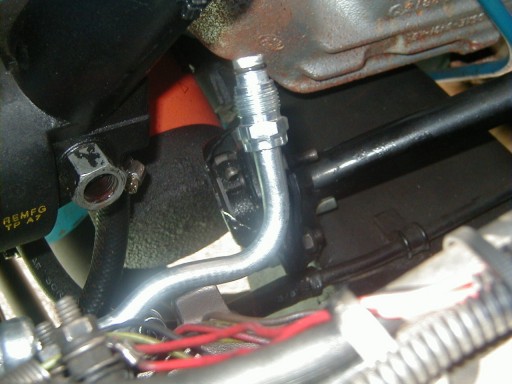
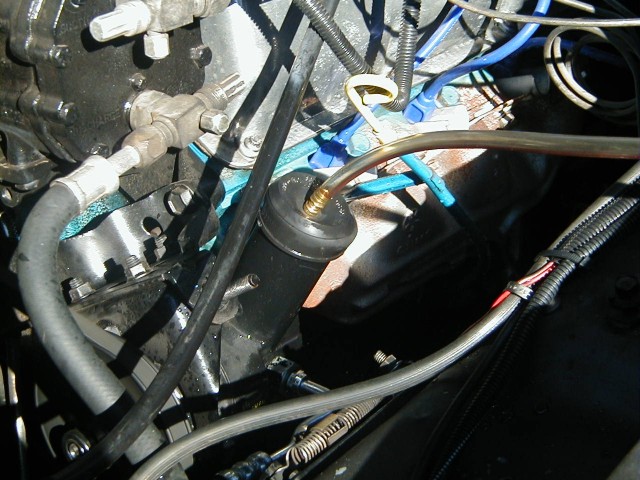
- Step Eleven -- Now that the
old box has been removed from the vehicle, it's time to put the new
one on. Here's a tip that will save you hours and hours of headaches
and frustration. Before you install the box, go ahead and put the pressure
hose on the box first (see Figure seven below). When installing the
pressure hose, it is VERY IMPORTANT to pull back on the hose while
you're tightening it. If you don't pull back on it, then the metal
hose could tilt to one side and the flair will not seat properly.
This will cause the hose to leak at the flair fitting and no amount
of tightening will stop it from leaking. Also, make sure you use Teflon
tape on the threads to help prevent PS fluid from leaking past the
threads.
 |
| Figure 7 |
- Step Twelve -- Now take the
box with hose attached and place it up on the frame. Again, I like
to install it from underneath. This box is heavy, so I like to get
right under the frame, place the box on my chest, and push it up
into place. Once you have it in place, install the three bolts that
hold it to the frame. I find it easier to install the bolt that is
closest to the front of the vehicle first and then install the two
bolts closest to the shock absorber. Important:
Do not tighten the three bolts all the way down yet! Leave the bolts
sticking out about 1/8" to 1/4" of the way to allow
the box to move around a little. You will need the extra play to
install the pitman arm and the return line later on.
- Step Thirteen -- Lean over
the driver's side fender and install the return line on the box. It
is a good idea to use Teflon tape and to hold back on the return
line when tightening down on the fitting, just like we did with the
pressure line in step eleven above. If you have trouble getting the
threads started, jiggle the box a little while starting the threads.
Sometimes this is necessary to get the fitting lined up with the
box.
- Step Fourteen -- If you are
installing a new pressure hose (and you should) go ahead and hook it
up to the power steering pump now. Just make sure you put the O ring
washer on the fitting before you install it (See Figure 8 below).
Also, DO NOT tighten the pump-side fitting down very much.
This fitting will is designed to swivel and is of the type that will
tighten up on it's own, so make sure you don't put more than 12
ft-lbs of torque on the fitting. All I do is run the threads in by
hand and until it stops and then just give it a slight
"snug" with a 5/8" open-end wrench.
 |
| Figure 8 |
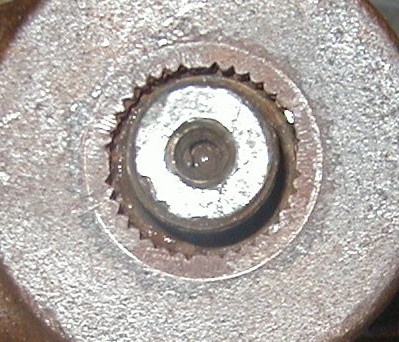
- Step Fifteen -- Now it's time
to align the PS Box so that we are sure it is in the
"center" position. Don't trust the manufacture of the box
that it was shipped in the correct position, as I have never seen
one yet that was centered right out of the box. To center the box,
slide the flex couple over the splines on the PS Box shaft. You do
not need to slide it on all the way or to tighten it down. I just
slid it on about 1/3 of the way (see Figure 9 below).
 |
| Figure 9 |
- Step Sixteen -- Now get in
the vehicle and gently turn your steering wheel all the way to the
right. The Bronco PS Box has exactly 4 turns from lock to lock, so
you will want to verify this by putting your finger at the top of
the steering wheel and turn the wheel all the way to the left until
it stops -- it should have made exactly 4 complete revolutions. Now
simply turn the wheel exactly two turns to the right and VOILA!
You've now centered your PS box.
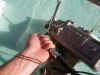
- Step Seventeen -- Now it's
time to install the pitman arm. You will notice in the three pics
below (Figures 10, 11 and 12) that there are 4 flat spots (or
groves) in the splines on the steering shaft and in the pitman arm.
Since we have centered the Power Steering box in step sixteen above
AND we know that the front wheels are straight the pitman should now
just slide right into place. You will have to "wiggle" the
box and the pitman arm a little to get it to clear the track bar
bolt, but this should not be a problem because we have not tightened
down the PS box yet.
 |
 |
 |
| Figure 10 |
Figure 11 |
Figure 12 |
- Step Eighteen -- Now install
the lock washer and pitman arm retaining nut on the steering shaft.
Do not tighten it down yet!
- Step Nineteen -- Now fully torque
down the three bolts that hold the PS box to the frame. Once tight,
go ahead and fully tighten down the pitman arm retaining nut.
- Step Twenty -- Now it's time
to install the flex coupler back on the steering shaft. We temporally
slid the coupler on the shaft in step fifteen above, but chances are
your steering wheel is not straight now that we have the box and
pitman armed fully installed (so you will need to slide it back
off). If your steering wheel was off center to begin with, then now
is the perfect chance to line the steering wheel back up to where
it's straight again. I like to get in the truck and make sure the
steering wheel perfectly straight, then gently slide the flex
coupler on to the shaft being careful not to move it. You may have
to recheck the steering wheel and slide the flex couple on and off a
few times before you get it perfectly straight.
- Step Twenty One -- When you
are satisfied that the wheel is now on straight, slide the flex coupler
all the way on to the shaft and reinstall the flex coupler retaining
bolt. Make sure you get this bolt nice and tight so it wont work
it's way loose.
- Step Twenty Two -- Okay, now
that everything is back together the fun really begins! (I'm being facetious).
Before we start the Bronco and test out our new box, we need to make
absolutely sure we get all of the air out the box and steering lines
first. The first thing to do is to jack up the front end so that the
wheels are off of the ground. Next make sure the power steering box
is filled to the proper level. Next, disconnect the ignition coil so
that the engine will not start. It might also be a good idea to
disconnect the fuel line going to to the fuel pump in order to
prevent the engine from flooding. Now get in the Bronco and turn the
engine over with the starter -- while at the same time turning the
steering wheel from lock to lock. Try to turn the wheel from lock to
lock at least 4 or 5 times (if your battery has enough juice in it). Note:
If you do not do this first then there is a very good chance that
you'll get lots of air in your lines and your power steering will
not work!
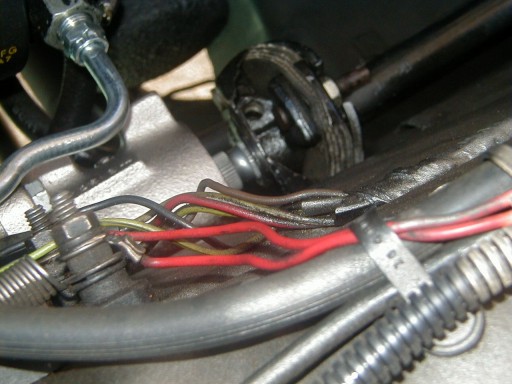
- Step Twenty Three -- Now
check the fluid in the power steering pump. The fluid level should
have gone down, indicating that when we turned the engine over with
the starter that most of the air was worked out of the system. At
this point, you can now hook your ignition coil and fuel line back
up and start the engine. You will want to leave the front end jacked
up so that you can continue turning the wheels from lock to lock to
work out any remaining air in the system (while the engine is
running). If you followed the procedures above and you still have
air in your lines, then it may be necessary to hookup a vacuum pump
to the power steering pump (while the engine is running) to help
work out all of the air in the system. Figures 13 and 14 below show
the "improvised" vacuum pump I made to help evacuate the
air out the system when I did mine. I did not have access to a real
vacuum pump, so I made one using an old carpet cleaner, two rubber
plumbing caps, two brass barbed-end hose fittings, and a length of
3/8" clear tubing. It's not the best thing in the world to use,
but after a while it worked.
So, what do I think of my new AGR box?
Well, it's not an earth-shattering change, but the steering is now nice
and tight with almost no play in the steering at all. It's definitely
better than the stock PS box. Hey, it looks good too and I'm looking to
forward to years of trouble-free service out of it.
***
Disclaimer ***
All
vehicle modifications listed in this article and most other articles appearing
in ProjectBronco.COM are for off-road use only and on vehicles
that are not driven on the street. Any modifications made to a
passenger car vehicle or light-duty truck should only be performed by
a certified mechanic and approved for use by the Original Equipment
Manufacture (OEM) of the vehicle.


|