|
 This
article may seem a little basic and unnecessary to many Broncos owners
because, lets face it, most people who own vehicles this old are a
pretty handy group of people. However, if you're like me, working on our
Broncos is just a hobby and you are learning how to fix it as you go
along. When I removed the engine in my Bronco, it was the first time I
had ever tried to remove and engine. I knew how to do it in
theory, but I had never actually done it. Removing an engine from a 78
& 79 Bronco is pretty straight forward, however, it is still a
complicated procedure and there are certain things that should be done
during this kind of project that will save countless hours of work and
make the project go as smooth as possible. This
article may seem a little basic and unnecessary to many Broncos owners
because, lets face it, most people who own vehicles this old are a
pretty handy group of people. However, if you're like me, working on our
Broncos is just a hobby and you are learning how to fix it as you go
along. When I removed the engine in my Bronco, it was the first time I
had ever tried to remove and engine. I knew how to do it in
theory, but I had never actually done it. Removing an engine from a 78
& 79 Bronco is pretty straight forward, however, it is still a
complicated procedure and there are certain things that should be done
during this kind of project that will save countless hours of work and
make the project go as smooth as possible.
Get
Help!
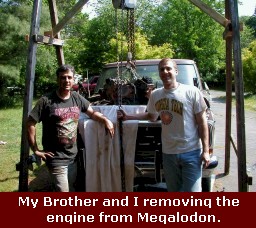
Trying
to pull your engine by your self will be nearly impossible. Even with
all the right tools, having someone else there to help you guide the
engine in and out of the engine bay is a necessity. Safety is big
concern here and each person should watch out for the other so that
injuries can be avoided.
Get
the Right Tools
Before
you even drain the oil out of your old engine, make sure you have all
the right tools to do the job. Listed below are the main tools you will
need to pull the engine out of your Bronco.
 |
An
Engine Hoist or an A-Frame.
|
You
can rent a "cheery picker" from many tool rental
companies for about $50.00 a day. If you have a smooth, flat
area to work on your truck, such as a patio or garage floor,
then a cheery picker will be ideal because they have wheels
and can be moved around with ease, even while supporting the
weight of a 500 lb. engine. |
|
If
your are like me and do not have a suitable place to work on
your tuck, then you may want to consider building or buying
an A-Frame. I opted to build an A-Frame because I did not
know how long this project would take me and the best spot I
could find to work was on my asphalt drive way. It cost me a
little over $160.00 to build it and it took me two full
weekends to put it together.
I used 3/8" bolts to assemble the A-Frame so I could
take it apart when I was done. I also purchased a used 2-Ton
chain hoist for $50.00. The A-Frame worked perfectly and did
not even budge an inch with the full weight of the engine on
it. I also strapped a tarp over the A-Frame to keep out of
the sun light and to shield the vehicle from the rain while
I was working on the engine compartment. |
|
 |
 |
 |
|
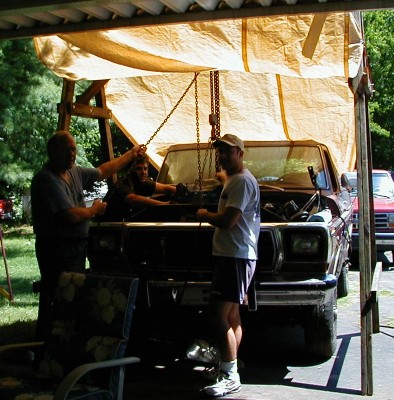
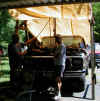
A-Frame
Diagram |
A-Frame
setup w/
Tarp.
My Dad and
Brother
help install
The
new engine |
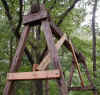
Close
up of
A-Frame |
|
A
Heavy-Duty Floor Jack
|
You
will need a minimum of a 2-Ton floor jack to jack up and to
support your transmission. Floor jacks are inexpensive and
can be picked up from any auto parts store for $25.00 to
$75.00 depending on the model and the jack's capacity. |
|
|
A
Complete set of Standard Hand Tools
|
Don't
even attempt this project unless you have a complete set of
standard sockets and wrenches. Remember that these Broncos
were built when Detroit was still building cars with the
"English" or "American Standard"
measuring system. Metric tools will not do you any good. A
good set of quality hand tools can get VERY expensive, so if
you do not have access to a set, then you may want to
consider having someone else do this project for you. |
|
|
A
Torque Wrench
|
You
will need to use a torque wrench many times during this
project. Even if you have been working on cars for many
years and you can pretty much guess how much torque you are applying
just by feel, it is still better to use a torque wrench in
critical areas such as when you torque down your manifold,
flywheel, or harmonic balancer. |
|
Now
that you have made sure you have all the tools you need and you have
someone to help you remove the engine it's time to prep the vehicle for
the engine removal.
|
Step
One -- Drive or move the vehicle to a suitable spot. It is
best to position the vehicle on a hard, flat surface. If a hard
surface is not available, then at lest try to put the vehicle in a
spot that is as level as possible. |
|
Step
Two -- Chalk the rear wheels of the vehicle behind and in front
of the rear tires. Also make sure the parking break is set, just
to make sure. |
|
Step
Three -- Remove the torque converter nuts. Just below the base
of the oil pan on the engine to transmission plate is the torque
converter access plate. Remove this plate to reveal the fly wheel.
The torque converter is bolted to the flywheel with four nuts.
There are two ways to remove them.
|
Using
the Starter -- If the engine will still turn over, have
a friend sit in the vehicle and "bump" the starter
until you have access to one of the nuts. Once you have
removed the first nut, make sure you mark the hole with a
piece of chalk with the number "1". Have your
friend "bump" the starter until the other three
nuts are accessible one by one. Once you have removed the
last nut, make absolutely sure that this hole is marked
well. That way, when you install your new or rebuilt engine
you know that you are putting it in exactly the way it came
out. A Word of caution ---
You may want to disconnect the ignition coil wire so that
the engine will not start, just to be safe. Also please
remember not put your fingers anywhere near the flywheel.
It's better to be safe than sorry. |
|
Turning
the Engine by Hand -- Another way to accomplish the same
thing is to turn the engine over by hand. If you need to do
it this way, remove the spark plugs first so that you will
not be fighting the engine's compression. You will need a
15/16" deep well socket and a 1/2 ratchet to insert on
to the harmonic balancer bolt. Simply place the socket on to
the balancer bolt and turn the engine clock wise (with you
facing the front of the engine) until each nut is revealed.
Depending on how hard it is to turn your engine over by
hand, you may need to slip a "cheater pipe" over
the ratchet so you have enough leverage to turn the engine.
You will need to remove the cooling fan and the fan shroud
to gain access to the harmonic balancer bolt. |
|
|
Step
Four -- Disconnect the Battery Cables. From here on out, you
will not need to have power to the engine. To eliminate the risk
of electrical shock, it's best to disconnect the battery at this
time. |
|
Step
Five -- Enlisting the aid of a friend, go ahead and remove
the hood. Bronco hoods are all steel and are quite heavy. It will
take two people to remove the hood off of the vehicle. Make sure
you scribe a line around the hinges to mark their position on the
hood before you loosen the bolts. You can also drill a 1/4"
hole through the hinge and the hood. Be VERY careful not to drill
through the top of the hood! When reinstalling the hood, stick a
1/4" dowel rod into the hole you drilled to align the hood
before fastening the hinges. |
|
Step
Six -- Drain all fluids from the engine. Drain the Radiator
and the motor oil. It is not necessary to drain the transmission. |
|
Step
Seven -- Remove the cooling system. Remove the cooling system components
in the following order:
|
Remove
upper radiator hose |
|
Remove
fan and fan clutch |
|
Remove
fan shroud |
|
Remove
lower Radiator hose. Be sure to place a bucket under the
lower hose at the bottom of the radiator before you remove
the hose to catch the remainder of the engine coolant that
will come out when the hose is removed. |
|
Disconnect
transmission cooling lines from radiator. Be sure to put a
drip pan under the cooling lines as some transmission fluid
will leak out. |
|
Remove
the Radiator. I have always been able to remove the radiator
by myself, however, it's not easy. Even the standard Ford 3
core radiator is heavier than it looks. There are only 4
bolts that hold it in. Simply remove all 4 bolts and lift it
out. |
|
|
Step
Eight -- Remove the power accessories.
|
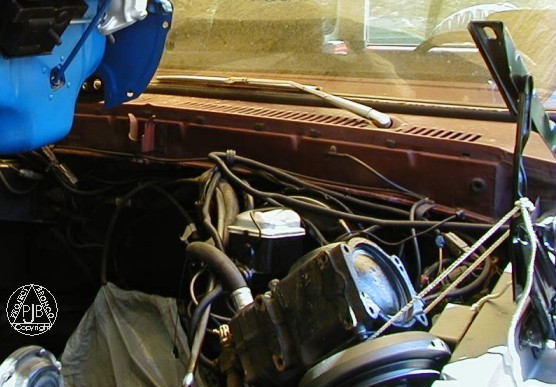
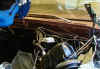
 First,
remove the Alternator. I did not have to disconnect the
wires to the back of the alternator. Simply remove the bolts
and set the alternator out-of-the-way on the passenger side
inner fender well. If you decide to remove the alternator completely
from the vehicle, make sure you mark the wires so you don't
get them crossed during reassembly. It's easier to make a
mistake when reconnecting them than you think! I did it when
I hooked mine back up and ended up blowing the voltage
regulator! But anyway, here is a picture of how it should be
hooked up, just in case :-) First,
remove the Alternator. I did not have to disconnect the
wires to the back of the alternator. Simply remove the bolts
and set the alternator out-of-the-way on the passenger side
inner fender well. If you decide to remove the alternator completely
from the vehicle, make sure you mark the wires so you don't
get them crossed during reassembly. It's easier to make a
mistake when reconnecting them than you think! I did it when
I hooked mine back up and ended up blowing the voltage
regulator! But anyway, here is a picture of how it should be
hooked up, just in case :-)
|
|
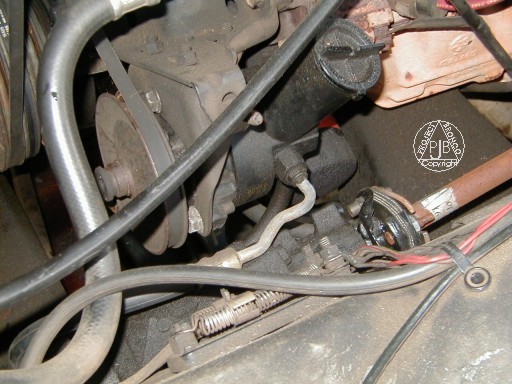
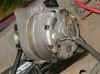
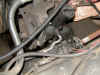 Second,
remove the power steering pump. Like the alternator, it
is not necessary to completely remove the PS pump. Leaving
the power steering lines attached will save you countless
hours of "aerating" the system. Simply disconnect
the pump from the brackets and tie off the pump out of the
way. I was able to set mine on top of the steering box and
tie the pump to the driver side fender well. I have include
a picture of my pump before I removed it just incase anyone
needs a reference on how it should look when it's hooked
backup. Second,
remove the power steering pump. Like the alternator, it
is not necessary to completely remove the PS pump. Leaving
the power steering lines attached will save you countless
hours of "aerating" the system. Simply disconnect
the pump from the brackets and tie off the pump out of the
way. I was able to set mine on top of the steering box and
tie the pump to the driver side fender well. I have include
a picture of my pump before I removed it just incase anyone
needs a reference on how it should look when it's hooked
backup.
|
|
 Third,
remove the AC compressor (if yours has AC). Again, just
like the alternator and the PS pump, it is not necessary to
remove the AC lines from the compressor. Simply remove the compressor
from the mounting bracket, flip the compressor over and set
it out of the way on the driver's side inner fender well. I
tied the compressor to the hood hinge with some twine so it
would not slip off of the fender well. I also tied the AC
lines to the master cylinder to help keep them out of the
way when removing the engine. Third,
remove the AC compressor (if yours has AC). Again, just
like the alternator and the PS pump, it is not necessary to
remove the AC lines from the compressor. Simply remove the compressor
from the mounting bracket, flip the compressor over and set
it out of the way on the driver's side inner fender well. I
tied the compressor to the hood hinge with some twine so it
would not slip off of the fender well. I also tied the AC
lines to the master cylinder to help keep them out of the
way when removing the engine.
|
|
Fourth,
remove the smog pump (if yours has one). My Bronco does
not have the smog pump on it any more so I can't be of much
help here. Also, only the 1979 models had SMOG pumps.
However, if your Bronco still has one, now would be a good
time to mark all of the hoses and lines that connect to the
smog pump. I would suggest going ahead and removing the pump
and all of it's related equipment and setting it all aside
from everything else. Do not throw this stuff away because
it will be very hard to replace later on. (I know, because I
have been looking for a 79 Ford truck with all of it's
original smog pump equipment still intact for over 2 years
now and I still can't find one!) |
|
|
Step
Nine -- Remove the Water Pump and the pulleys. This step is actually
optional. I had enough room when removing my engine to leave the
water pump and the pulleys in place. I went ahead and removed them
anyway because I wanted as much space as I could get. It's entirely
up to you. |
Please
be patient, this article is still under construction!!! (Got to gather
up the rest of my notes!!!!)
|